As an illustration of the great variety of form that may be expressed by the key-block, a reproduction is given (page 33) of an impression from a Japanese key-block. It will be seen that the lines and spots express much more than boundaries of form. In the case of the lighter tree foliage the boundaries are left to be determined entirely by the subsequent colour blocks, and only the interior form or character of the foliage is suggested. The quality or kind of line, too, varies with the thing expressed, whether tree, rock, sea, or the little ship. The design, too, is in itself beautiful and gives the essential form of the entire print.
The study of the drawing of any of the key-blocks of the Japanese masters will reveal their wonderful power and resource in the suggestion of essential form by black lines, spots, and masses of one uniform tint of black or grey. The development of this kind of expressive drawing is most important to the designer of printed decoration, whether by wood blocks, or lithography, or any other printing process.
Other good types of drawing for the purposes of key-blocks in wood are given on Plate V facing page 26 and Plate XVI p. 110 in Appendix.
When the key-block with its design pasted upon it is thoroughly dry, a little sweet oil should be rubbed with the finger at that part where the cutting is to begin, so as to make the paper transparent and the black line quite clear.
In order to keep the block from moving on the work-table, there should be fixed one or two strips of wood screwed down, to act as stops in case the block tends to slip, but the block should lie freely on the table, so that it may be easily turned round during the cutting when necessary. One should, however, learn to use the cutting knife in all directions, and to move the block as little as possible.
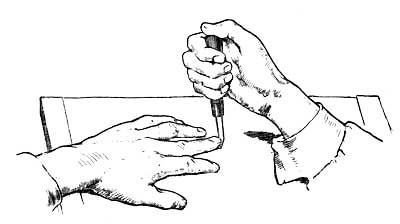
The knife is held and guided by the right hand, but is pushed along by the middle finger of the left hand placed at the back of the blade, close down near the point. The left hand should be generally flat on the work-table, palm down, and the nail of the middle finger must be kept short. This position is shown (fig. 7) on p. 30.
The flat side of the knife should always be against the line to be cut.
Sometimes it is convenient to drive the knife from right to left, but in this case the pressure is given by the right hand, and the left middle finger is used to check and steady the knife, the finger being pressed against the knife just above the cutting edge.
A good position for cutting a long straight line towards oneself on the block is shown below (fig. 8). The left hand is on its side, and the middle finger is hooked round and pulls the knife while the right hand guides it.
In all cases the middle finger of the left hand pushes or steadies the knife, or acts as a fulcrum.